Face Mask Detection - Overview - Part 1
If you are just after the code, you can find it on Github.
Introduction
As with many people around the world, I have been subject to lock-down restrictions as a result of the COVID-_19_ pandemic. In what are undoubtedly very challenging circumstances, I wanted to make the best use of the newly afforded spare time I found myself with to learn some new skills and make a small difference in the fight against this virus if I could.
Whilst the the use of face masks has been prevalent in many Asian countries for some time, their use has now gained momentum across the world to such an extent that they are either highly encouraged and/or mandated to stop the spread of viruses.
I happened upon the idea of creating a face mask detector as tool which could be used to inform on face mask usage compliance in an automated way. This project will address the steps required to build the detector whilst a future project will look to integrate that detector into an application framework that returns usage data.
In going about the steps necessary to create the detector, I considered one of its intended use cases which would involve performing inferences (make predictions) at various locations, often remote, which tend to have limited bandwidth and/or computational power.
If it is not possible to stream large amounts of data to the Cloud for inference or employ high powered servers everywhere then what can be done? The answer is Edge Computing.
Edge Computing
With Edge Computing, we perform the inference at the location in which it is required and relay the outcome to Cloud.
This approach has several advantages:
- Low Latency: No need for the video stream to be relayed back to the Cloud
- Low Bandwidth: Only the result of the inference needs to be transmitted
- Low Cost: The model will be optimised for usage on low cost hardware
- Enhanced Security / Privacy: Facial data never leaves the local device
So what Edge Device shall we use?
One of the most well known, ubiquitous and low cost IoT devices is the Raspberry Pi, which I happen to own, so I thought why not make use of that for my project!
The challenge is that the Raspberry Pi on its own is relatively under-powered and not well suited for the task of performing inferences on demanding Machine Learning models at an acceptable speed.
But what if there was a way to make the Pi capable of performing the required inferences in a low cost manner? Enter the Coral USB Accelerator which is an Edge TPU coprocessor capable of up to 4 trillion operations (tera-operations) per second (TOPS), using 0.5 watts for each TOPS (2 TOPS per watt).
The Pi in conjunction with an Edge TPU would be capable of fulfilling our project objectives. However, the TPU has a number of limitations that have to be taken into account, whilst designing the solution.
It is important to remember that the TPU is small ASIC not a GPU. That is it can do one thing and it can do it really well, it is not capable of working on generalised workloads.
The one thing it can do, is run TensorFlow Lite (TFLite) models. As you might expect from a device designed by Google.
Here are some of the limitations:
- TFLite models have to be quantized, optimised for 8-bit integer operation before use.
- The TPU can only hold one model in memory at once
- There is a slight delay during the initial invocation of the model whilst it loads into the TPU memory
Object Detection vs Classification
With the above considerations in mind, I set out to identify the best way in which to design my Face Mask Detector.
A search of the internet revealed a couple of existing examples in which people had made face mask detectors. This is not a surprise. With half of the world population under lock-down conditions, the same idea is going to crop up!
But in looking at how those face mask detectors had been designed, I quickly realised that they would not be suitable for my project.
Those projects made use of a classification algorithm to detect masked and unmasked faces. A classification model will only state if the provided image (or video frame) has the label (what we are attempting to predict) present in the image, not where it is located, therefore we cannot provide a bounding box around the label with this method alone.
To get around that challenge, those projects made use of an additional machine learning model capable of detecting human faces, even if they are wearing masks. The objection detection model would detect the faces masked or not and the face mask classifier model would then determine if that face had a mask or not.
You will have noted that those approaches require the use of two machine learning models; but unfortunately the Edge TPU is only capable of handling one model at a time and the onboard CPU on the Pi is too slow to perform inferences.
Therefore the only viable approach to our problem is to train an Object Detection model using TensorFlow, trained on masked and unmasked human faces. The model would be optimised to operate on the Edge TPU during training, as this is more efficient than performing post training quantization. Following the training process, the model would then be converted to TFLite for use. This means we only require one machine learning model to achieve our objective, which can be run on the TPU, thus working within the limitations of our hardware.
Microservices Architecture
We have addressed the concerns around selecting a machine learning model that can function on our hardware but what about other aspects such as ease of deployment, manageability and standardisation? We can address those concerns through the use of a microservices based architecture and Docker.
I personally am I huge fan of Docker and the amazing innovations this technology has been able to bring about through its use.
The Face Mask Detector will be packaged into a Docker image that can be deployed to our edge devices. This will provide a range of benefits such as the ability to deploy a standardised and fully tested configuration to devices easily and quickly.
As each Docker container is essentially self contained, we do not have to worry about dependency conflicts should we install another container on the same device.
We will add a small web server to our inference application so that the results are displayed on a web page that we can access remotely.
The modular nature of our design means that we can easily add another service to our device such as AWS Greeengrass to enable communication to a Cloud service and store the results.
Machine Learning Workflow
Once we have determined that we have a problem that can be addressed with Machine Learning, it is typical practice to follow a workflow so that we can address each step of the process in a methodical way.
The primary stages of the process can be broadly broken down into the following activities as illustrated in the diagram below:
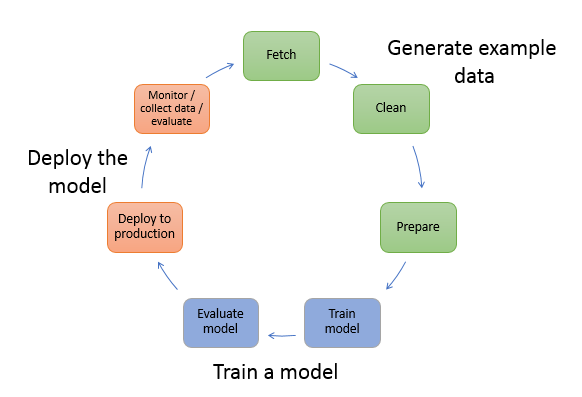
Image courtesy of AWS©
In our introduction, we focused on the issues around the Deploy the model stage but we didn’t really touch upon the Generate example data or Train a model stages.
I have implemented the steps within these stages within Jupyter notebooks hosted on Google Colab. This afford a number of benefits such as free usage of Cloud resources (no need to have an expensive GPU at home), allows for each step to be explained easily, for collaborative working across teams and it mimics the setup you would encounter when working on Machine Learning projects in production such as within Amazon Sagemaker.
Generate Example Data
As with many machine learning projects, getting hold of quality training data is often one of the most challenging aspects and the largest part of the amount time is spent generating the example data. This project was definitely in agreement with that paradigm. Making sure the required training data is acquired, cleaned and prepared into the appropriate format is crucial and tends to take much longer than you anticipate.
You might be fortunate and the problem you are trying to address has high quality, properly annotated training data that requires minimal transformation. But that is seldom the case. In reality you will find a lot of time is spent acquiring the data and transforming it into the required format.
Within this project, we will only be making use of a relatively small amount of images, which helps speed up training time, however that comes at the result of reduced accuracy. As the old adage in computing goes, rubbish in, rubbish out!
For a production model, an investment has to be made in procuring quality training data on which your model can be trained, which where fully managed services such as Amazon SageMaker Ground Truth can assist by providing data labeling services that makes it easy to build highly accurate training datasets for machine learning.
But even within the confides of this project, which is a Proof of Concept (PoC) rather than a Production application, there were challenges in generating the required data.
For this project the machine learning model needs to be able to identify two classes of objects; unmasked and masked faces. Images of unmasked faces (just normal human faces) are relatively easy to obtain although even they are unlikely to be in the format we require. Masked faces have the double challenge of being difficult to obtain and not being the required format.
I decided to address the challenge of acquiring the required data in two ways; firstly to generate my own training data and secondly to supplement that data with some additional data acquired from other sources.
A started off by acquiring some royalty free images of faces that were created by a GAN (generative adversarial network). These are artificially generated images of people that do not exist, which has the added benefit of avoiding any privacy concerns.
Those images were split into two sets; one for use in the unmasked category and another within the masked category.
Firstly, lets start with the unmasked category. We have a load of images of faces but unfortunately images alone are not enough for an objection detection algorithm as would be the case with classification. We also need annotations which describe where in the image the bounding box of a face should be drawn.
So how can we save some time in creating the annotations without having to manually label each image? Fortunately for us, face detection algorithms with accessible libraries are readily available, therefore we can create a script to automatically scan a folder of images with human faces and generate the required annotations containing the locations of the bounding boxes for them in XML format.
We will repeat this process for both sets of images. But you might ask neither set has any images of masked faces? For the second set we will also perform an additional step of taking a pool of images of face masks and automatically placing them on the faces. This is achieved by making use of existing facial detection algorithms that are able to identify facial landmarks and thus guide the process of placing an image of a mask in the correct location on the faces.
Whilst these artificially created images of faces wearing face masks are far from ideal, and would not be recommended in a production environment, it is a useful option to have for our purposes.
But the aforementioned images alone are not enough to train our model to a sufficiently high enough degree as they are too similar and do not alone the model to generalise. Therefore, I supplemented those images with a dataset of masked faces from Kaggle, a well known Data Science resource.
That dataset was however not in the required format. Whilst it had annotations, the labels were not using the same convention, therefore a script was required to rename them.
There are additional steps required to convert the XML files into a CSV and then into record files which TensorFlow accepts. I will address those steps in more detail later on.
Train a model
You are finally ready to train your model! You might well find yourself having to revisit your training data due to an unexpected error that appears but lets assume your data is solid.
In case you are not already aware, we will not be training a model from scratch as that would take an
inordinate amount of time and be wholly unnecessary. Instead, we will make use of the concept of transfer learning in which we will take an existing pretrained model, in our case the MobileNet v2 Single Shot Detector (SSD), and retain the existing layers and their weights but retrain the top layer with new weights from our dataset.
Unfortunately the TensorFlow Object Detection API is still stuck on v1.x at the time of writing and it lacks support for the developer friendly additions of Keras (a high level interface that runs on top of TensorFlow that offers an intuitive set of abstractions).
Therefore we will have to get our hands dirty in writing the pipeline config file that defines the hyperparameters, the optimisation algorithm, the location of the existing model, the training data, the quantization etc.
We will use the Tensorboard to evaluate how our model training is progressing.
Once we are happy we have a trained model then we have to perform a number of steps before we can test it out.
Export the model graph which is created from the model checkpoints that result from the training and convert that graph into the TFLite model
If we wanted to create a TF JS model then there is a slightly different process to undertake.
Deploy the model
You will have no doubt have gone through multiple iterations of model tuning during the training process before you arrive at a model with which you are happy.
Once you have that model, it is time to deploy it on your target device.
We will making use of a Docker image for this.
I have provided you with the Dockerfile file needed to build your own Docker image for RPi or AMD64_x86 architectures that can host your trained model.
Alternatively, you can make use of my Docker images which are available on Docker Hub.
The example makes use of a locally connected webcam but you can easily change this to take a feed from a network camera.
